Labels

Showing posts with label Reviews. Show all posts

Thursday, October 23, 2014

Exciting News + LA Girl Glazed Lip Paint Review

Hey Everyone!


How is everyone's week going? I hope its going well because I am sure that mine is :) I have some amazing news to share with you all. I have now partnered up with Jasmine Nails and Spa and will be working with them as a makeup artist and their social media coordinator. I am sure most of you already knows this through facebook but I wanted to write it all out formally.

Jasmine nails and spa is a wonderful salon and spa located on the corner of  Westney and Williamson  in Ajax. The owner Meera is a very kind hearted and intellectual person and she wanted me to join their amazing team and be part of their already fabulous salon. What am amazing opportunity right?

Details of all their other services will be provided in the link below. Make sure you check them out and book them for your next services * If you see me say hi :) *

https://www.facebook.com/pages/Jasmine-Nails-and-Spa/612599578850878?ref=hl
http://jasminenailsandspa.ca/

They will be having promotions to keep a lookout either on my blog or facebook page to take advantage of their deals.

Now! On to the review on La Girl Glazed lip gloss

I got home from work and was super excited when I got this package because I really wanted to see what all the hype was about these lip glosses!

So here is my take on them I would rate them a 4/5...not bad right! Totally worth the money and I want to get all the colors now...yikes

Pros:

-The colors are amazing and they just launched a whole bunch of new ones
-They smell minty
-Not sticky
-VERY good pigmentation
-Only $3.25 on ladymoss.com (compared to the too face melted lip colors which are almost $25)

Cons:

-Not really that long lasting (but they do stain your lips a bit)
-VERY glossy! (I mean more than I am usually okay with)


The picture below is without flash the colors are:
Top: Pin Up and Hot Mess
Bottom: Blushing, Coy and Bombshell


The picture below is with flash 


Thursday, March 6, 2014

Love it or Leave it #5

Hey everyone,


Sorry for being a little missing in action! Ive just been really busy with tonnes of work. I hope your keeping up with my facebook page to see the wonderful beauties that I have been working with :) if not the link is here https://www.facebook.com/pages/Makeup-by-HK/251331084954099?ref=hl make sure you like and follow.

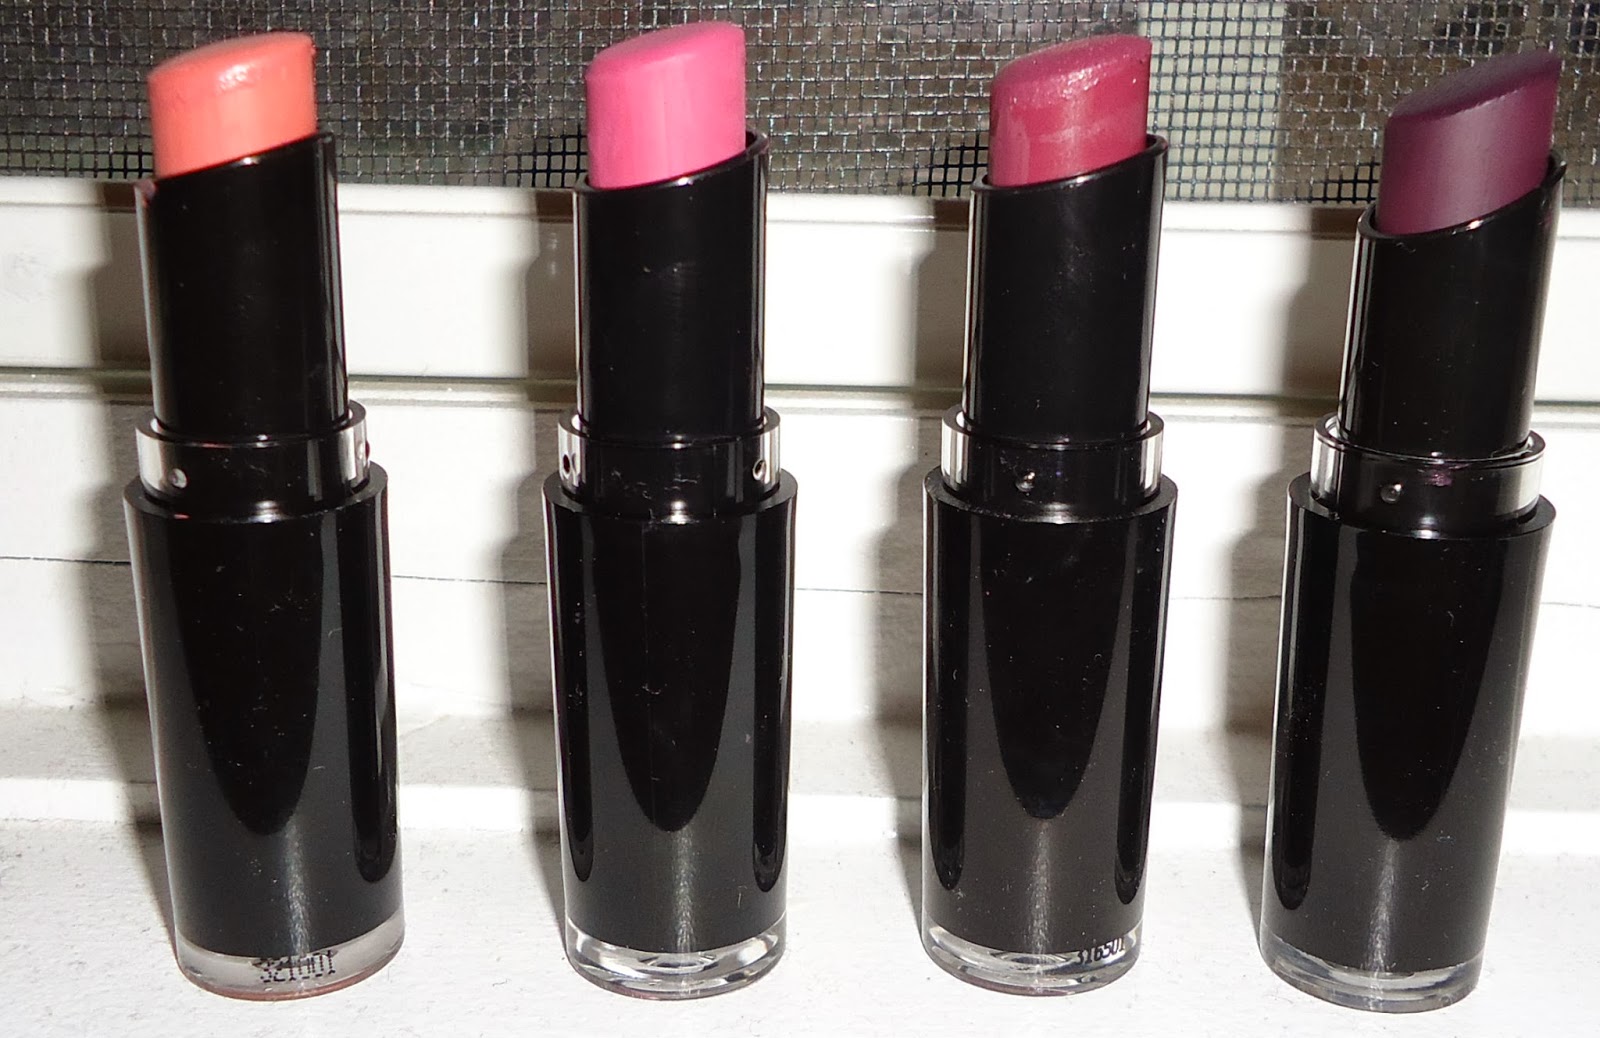
Now I wanted to do a review on a couple of AMAZING lipsticks that I have come across. Lately I have been melting and potting majority of my lipsticks to keep in a palette to save some space. While I was doing this I realized that I was missing a few colours that I wanted in my kit. So off I went to shop for some new lipsticks. My first stop was Walmart because I heard there was a sale on a Revlon lipsticks however when I got there I discovered these amazing Wet and Wild lipsticks (thanks to my sister in law Yousra)

 
The colors that I picked up were Just Peachy, Think Pink, Mauve Outta Here, and Vamp It Up. I have some swatches below the first picture is with flash and the second is without in natural lighting.


Overall I would rate these lipsticks a 4 out of 5. The darker colors have a really long lasting power they will come off but still manage to stain your lips for a really long time. The lighter colors are kind of less likely to last a longer period of time. The finish is VERY matte ( I love this) however some people may find that as a Con. Another positive about these lipsticks are the price. At Walmart I paid $2.75 for each lipstick!! I was super pleased that for the price the quality of the lipstick was not compromised.

All in all I would recommend these lipsticks they are dupes for so many Mac lipsticks that sell for $18. Ladies do yourself a favor and grab these for your kit or even for yourself :)

Stay tuned for my next review it will be on a new Mascara im trying out....

Until then Be safe and happy lipstick shopping :D


Saturday, November 23, 2013

Love it or Leave it #4


Hey everyone!
It was 8:20 AM on November 20th and I went ahead and tested out the new Loreal Butterfly Mascara. I worked a full 7.5 hour shift and watched the outcome of this product all day.

First and foremost I just wanted to say that I LOVE THIS MASCARA! Okay now on to the review :)
The first thing I want to say is that the wand is shaped really awkwardly and NOT using it properly will cause a great mess. I use the curved part for my top lashes and the flat side (bottom of the brush) for my bottom lashes. This is a plus because I can never find ONE mascara for both top and bottom. Sometimes the brush is too big other times the brush doesn't separate and clumps up product. This brush glides through the lashes so smoothly.
With some mascaras that I have been using lately I have been noticing that by the end of the day my lashes will start feeling really hard (I mean like potatoe chip crack in half hard). This to me was really scary because when I was taking off my mascara with face wash I would need to scrub extra hard that would damage and even pull my lashes out. This mascara did not leave my lashes feeling hard at all! Take this in, I wore it 10 hours straight the other day and I didn't even realize I was wearing mascara that I was about to SLEEP with it on until I remembered that I hadn't washed my face prior to hitting my pillow.

Below are a few before and after pictures

(no mascara at all)


(one coat)


(BAM...lashes at two coats)

There was no flaking however I realized flaking is a hit or miss it really just depends if you got a good batch or not but that is the case with any mascara.

The ONLY negative thing I can say is that it is a little pricey. However I know that since its a newer mascara it will be higher than the rest.

I rate this product a full 5/5 (price is meh we cant do anything about that :P )

I hope you enjoyed my review and leave a comment if you have tried this mascara and what your thoughts are. Let me know if there are any other products you want me to try out.


Tuesday, July 23, 2013

Goodies #1

Hey Everyone,

I hope you are all having a wonderful beginning to your week! I wanted to do a quick post of some goodies that I picked up from the States when I last visited. First I just wanted to say that not all drugstores carry the same makeup brands (here and even the US). I know for sure that NYX cosmetics are only found at Rexall Pharmaplus stores in case anyone was wondering (I actually saw some at Pacific Mall that were double priced don't be fooled ladies). Trust me NYX has some really epic blushes and eyeshadow palletes + pencils. Do try them out and Ill do blog post on some of their stuff that I love aswell.

Anywho when I went to the states I asked my lovely hubby to stop by RiteAid. Its a typical drugstore there, and I wanted to go ONLY because I knew that I would find Jesse's Girls cosmetics there. Recently a youtube guru by the name JuileG came out with a nail polish line for the company so I got three of those. I also picked up two of their loose pigments which are AMAZING!


I have some swatches below incase anyone is interested. If you have tried any of these products do let me know your feedback :) 


On the left they were applied wet with fix+ from Mac and on the right they were applied with no base! Either way they look amazing


Wednesday, July 3, 2013

Love it or Leave it #3

Hey Everyone,

Its been a while since I did my last love it or leave it post so I thought I would let you guys know about some products that I have been trying. Instead of doing one product per post, I am going to combine a couple so that its much more informative in one post.

For starters I noticed that since the weather got warmer my hair has been going CRAY! I mean frizzy and oily not to mention falling :( I was watching TV a couple of weeks back and saw the commercial for Loreal Arginine Resist X3  and I really wanted to try it. I purchased the line to try all the products in sync and trust me Ive been LOVING IT. I would defiantly recommend this products. Ive been using the shampoo and conditioner for 2 months and the rest of the products its only been about a month.

I usually just shower with the shampoo and conditioner 2-3 times a week because my hair is long. Washing more frequently can actually damage your hair and strip away essential oils from your hair thus making it even more oily to replenish itself. Then once a week I will use the hair mask. The hair mask is really cooling you can feel it working on your scalp right away. It leaves your hair feeling so soft and smooth. After I towel dry my hair I use the reinforcing spray to protect my hair further more. I have seen much improvement in my hair and maybe 2 months later ill post another update.

 Do leave your thoughts and comments on if you tried these products out (I am not being compensated for my review all my thoughts are solely based on my opinion). I love hearing how people are taking care of their hair. Being a woman who covers her hair, I noticed we have to take EXTRA care of our hair and any and all tips help.


Next on the list if the Loreal Falseies Mascara. Since the I opened and used this Mascara it has been the worst ever! The formulation was just a mess. At first when I used it a couple if times it was a really wet formula that would get everywhere after blinking but when it dried it would flake all over my face during the day. I left it unused after I opened it for a week. However that didn't help at all (assuming that drying it out would be better) instead the formulation was flaking halfway through the day worse than before. I realized that at work I would check the mirror and there would be mascara flakes on the top of my cheekbones. I would not recommend this mascara to anyone however my review is kind of late and I am sure some of you probably already wasted a bit of money on it. Instead do check out my review on my mascaras that I love. My number one is always the Loreal Telescopic, It never fails me :)

Have a happy Wednesday everyone.

Wednesday, May 29, 2013

Razor Sharp


Hey Everyone,

Here is a quick blog post of a look that I did a few days ago. I went for an extremely sharp wing extending from my eyeliner with bold red lips. A trick that I used to get the sharp crease was placing a business card to the outer corner of my eye and using it as a guideline while placing my black eyeshadow.
Another easy trick would be using a flat angled eyeliner brush and making the initial straight edge and then blending lightly. (diagram below....very basic lol)


The classic pinup look always has a bold red lip and trust me I'm totally on board. However lately my lips have been chap central!!!!! Here's a trick that I use once in a while, its been working wonders. Take a little bit of brown sugar and mix it with a 1/2 teaspoon of honey and then rub them all over your lips (this will feel exfoliating so dont be too harsh). Not only is it yummy lol but it really leaves your lips feeling nice and soft and hydrated.


Hope you enjoy the look and tips and tricks. Enjoy the rest of your week <3


Monday, May 6, 2013

Love it or Leave it? #2

Hello Everyone,

Today's blog post is going to be about my favourite lip combo of the moment. The master recipe is Mac Pro Long wear lip liner in the colour More to Love and then over top with the Mac Matte Lipstick in Silly.

This lip liner has the longest staying power ever! I love it. For someone who has trouble eating or sipping away their lipstick I would highly recommend these lip liners. I did fill in all of my lips before applying my lipstick on top which definitely helped. warning *must be removed with makeup remover or wipes*

There are a few pictures below! hope you enjoy and stay tuned for another love it or leave it installment tonight!!

toodles!


Tuesday, March 19, 2013

Revlon Colourburst Lip Butter

Hey everyone,

I wanted to do a review on the Revlon Colourburst Lip Butter. I have tried out two colours one that is a little natural and the other a little more bold. (pictures below)


I find that these lip butter go on very smoothly and feel very moisturizing on the lips. One thing to keep in mind I would recommend that you outline your lips with some kind of lip liner because they will feather out. Another thing about these lip butters are that they are very glittery. The glitter is not fine so on the lips it feels a little chunky. The Peach parfait I bought thinking it would be very coral like the packaging however when I wore it on  my lips it was very natural and just slightly tinted my lips. None the less I do really enjoy this lip butter and its more of an everyday kind of colour. (picture below)


The second colour that I picked up was Lollipop. This colour is a bright fuchsia pink with even  more glitter than the first one! Its a really bright vibrant colour the swatch was exactly what I saw in the packaging (the picture didn't do justice). Keep in mind these lip butter don't have a long stay power but with the pink one I noticed after eating it still stained my lips a little and the glitter did not budge one bit! (pictures below)


Overall I really enjoyed these lip butters! Try them out and let me know your thoughts.

Until next time... Toodles :)

Tuesday, November 13, 2012

Love it or Leave it? #1

Hey everyone,

Ive been trying out a couple new products and wanted to do a few mini reviews on the products after using them for a month ( a little bit over a month).

Revlon Photo Ready Powder: I picked up this powder only because my shade in the Rimmel Stay Matte powder was out at my local rexall. I love the Rimmel Stay Matte powder ever since my cousin introduced me to it because it is light and absorbs oil quick without leaving your face feeling caked. So I thought I would give this powder a try and give you guys my opinions on it.

Looking at the product there are clear visible shimmers in the powder. This is because this powder is made for taking photos so it would help in reflecting light. I really do like this powder but NOT for everyday, its a little too much. The feel of the powder on your face is light but the shimmers are obvious and would only work if your outside during the day or at an event at night (and obviously for pictures hence the name). The pictures I took were in natural light because I noticed with flash the shimmers were more obvious. However it is really good in coverage and on the face it looks really nice (my pictures below are of me wearing this powder)


The packaging is kind of awkward and big since im used to circular face powders that fit nicely in my makeup bag. There is a little brush inside the case but I didnt bother to use it and opted for my soft sigma brush instead. The concept of the product is good it can be achieved by using a regular face powder and a light dusting of a shimmer on top such as a MAC minizeralized skin finish or a shimmer block. However the convenience of a two in one product is always good!


So what do I have to say about this product? Love it! do try it and leave a comment on how you feel and what your thoughts are of the product

Toodles <3

Thursday, August 9, 2012

Wing it up!

Hey Everyone,

Long time no post I know, for that I do apologize! Ive just been really busy with work and thanks to all for your support I have been busy with clients! But I'm not complaining I love every minute of it. My blog has over 3100 hits, and I can NOT thank you guys enough for everyone who stops by. Ive been meaning to do a blog post of winged eyeliner for a while but never got enough time to work on it, thanks to the long weekend that just past I managed to squeeze in some time and compose this for you guys with a few handy tips and tricks, Hope you enjoy! :)


Tip 1: The Brush

This tip is really tricky depending no what you are used to using some people are better with a fine haired brush some people with a felt tip some people like to use a totally separate brush like an angled one but it really depends on what your hand is comfortable with which can only be determined with trial and error! (depending on how it turns out, lets just not leave the house after that session :P)

Tip 2: The Product

There are TONNES of eyeliner products from pencils, brushes, markers, gel, glitter, water activated, and even a wet eyeshadow will do but it all depends again on what suits your eye lids and what your comfortable using. *WARNING* your eyelids are VERY VERY delicate and sensitive so make sure you try your product on your hand to see if it tingles or not and even get a professional to recommend something that is good for sensitive eyes id try something like Tarte or Clinique they are awesome all natural eyeliners that don't burn!

Tip 3: NO PULLING!

Its natural to pull and tug on the top of your eyelids to get a straight line but its the biggest mistake people do when applying eyeliner. Its damaging to the lid and can cause premature wrinkles and crows feet...yikes!
Try taking a mirror and placing it below your face sort of below your nose and look downward then try applying your eyeliner. Another tip use really small strokes instead of a one swipe shot, it'll opt for less of a mess up! Another trick is to rest your pinkie on your upper cheek to help give your hand stability

That's all for my tricks and tips on eyeliner! Enjoy the pictures a lot of work went into creating them :) Feel free to leave comments and suggestions on what you guys want to see next on my facebook page and stayed tuned for a HUGE contest I'm planning for the end of August worth over $100!

Tuesday, May 8, 2012

Tips and Tricks: Mascara 101

Hey Everyone,

I get asked all the time what mascara do I use, how are your lashes so long, are your lashes fake?! Well here's the thing my natural lashes are pretty decent sized but...there are few tricks that I learnt that play up my lashes really well and ill explain them all in this blog post.


Tip 1: Formulation 
You need to find the right mascara formula that works best for your lashes. This is all through trial and error trust me Ive had my fair share of mascara's from high and low ends!

Voila! my handful of mascaras! If your lashes are really stick straight and not too long, go with a formula that isn't too wet because that will weigh them down more (choose something in the middle like the Buxom Mascaras found at sephora) just make sure you curl your lashes with a lash curler first at add some lift!

These type of brushes (pics below) are really really good for separation and volume at the same time! the one below is a wonderful light formulation doesn't leave your lashes heavy and awesome for everyday.

 The buxom mascara below is a tiny bit more on the wet side but its really really black and dramatic!
 On the other hand in your eye lashes are really sparse and thin choose a THICKER formula but separating at the same time (try the Covergirl Lashblast for separation and thickness or Loreal Voluminous below which is my favourite all time for a lot of volume but its not really separating so you might need to get a mascara wand and comb through your lashes with it after which is what I do I always end up using two mascaras for the best results even on clients)

Tip 2: The right wand
If you find a formula that works but not the right wand do what I do and double up I start with my Buxom lash mascara (2nd picture in this blog post) make sure my lashes are coated and separated and then add Loreal voluminous on top for a fuller effect and if I'm going out then ill use the smaller buxom mascara for a more dark dramatic look) that has a more compact wand and disposes MORE product. Try to use a smaller wand if you have harder to work with lashes it'll save you from have mascara spots all over your eye lids which can ruin your eyeshadow aswell. Another thing to remember is that small wands are wonderful for the lower lash line like the two pictures below of the Bare minerals mascara and the Rimmel Lash Max (these brushes will coat ALL the little lashes on your lower lashline giving a more cleaner and separated look)

Tip 3: Curl!
Always use an eyelash curler even if you think "yea right my lashes wont curl"..... just curl them! Try to curl at the base of the lashline 2 pumps and then move the curler up a tiny bit to the middle of your lashes and curl once more. This will ensure a smooth curl.

That's all for the mascara tips that I have so far. Let me know what you guys think and if this helps! and comment if you want more posts on mascara reviews or lash care posts (Ive been testing out a few things) until then, Take care :)

Thursday, April 5, 2012

Tips and Tricks + Contest: Be Bold!

Hello Everyone,

Lately bold lip colours have really been in from corals, bright pinks, pale pinks, and burnt oranges. However not eveyone is comfortable rocking really bold lips but there is a way to wear bold lips without being an overkill. Also I am holding a contest for the month of April, im giving away a sigma brush kit to a lucky winner, all you have to do to enter is leave a comment on this blog post below or on my facebook page, and ill pick a random winner by April 30th Midnight, and just to make things super duper fair its open worldwide and anyone can enter just make sure not to spam other peoples comments :) so heres whats up for grabs -> http://www.sigmabeauty.com/?Click=245427

check out the make me classy travel kit above because it could be yours ;) so good luck and I will announce the winner here and on my fb page by April 30th...now on to the tips!

Tip 1: Moisturize!

Bold and chapped lips = BIG NO! make sure that you moisturize your lips with Vaseline or carmex (I always keep some in my traincase) . A nice tip is to put chapstick or whatever lip balm you have handy on your lips and do your face and eye makeup and right before you put your lipstick on just dab your lips with a napkin to take off any extra. Trust me its really unattractive to have flaky lips *YUCK*

Tip 2: Lip Liner

Try to always make sure you have a matching lip liner to go with your lip colour because using lip liner before lipstick will ensure that your lipstick does not feather out in any fine lines and stay within the lip perimeter. Also fill in your entire lips with the lip liner to get a longer lasting finish if you just keep lipliner with a light coating of lipstick it'll have a much more matte finish which some people might find more suitable.

Tip 3: Dab Dab!

If your not comfortable smothering your lips with lipsticks just lightly dab the lipstick on for a more sheer colour wash and add a little more moisturizer to help even out the colour.

Tip 4: Focal Point

Make sure that your keep your face a little more neutral and let your lips stand out. If your going to have bold lips try to not have busy eyeshadows to distract and conflict with the lips.

Sunday, February 19, 2012

Tips and Tricks: Beauty Tips

Hey Everyone, Im going to try and post a lot of tips and tricks for everyone so that we all can look and feel good together, ill call the series Tips and Tricks and this is the first installment called Beauty Tips. Listed below will be some awesome tips that I have found in magazines and articles and then personally tried and have noticed a big difference. So....Lets get started!

First off I just wanted to give everyone a little background research that I came across while putting this post together. Skin has two types of aging which are intrinsic and extrinsic. Intrinsic aging is normal and a part of life and lets face it we cant be forever young so aging gracefully is still an option and the best one at that! however extrinsic aging is caused by factors that are in our control which we tend to forget and overlook and actually even inflict upon ourselves without even knowing! Yikes!

Tip 1: Cover it up
Covering up your face and protecting it from sunlight can actually prevent premature wrinkles in the skin. So ladies pull out those huge sunglasses and get that delicate area around the eyes covered because we all know that crows feet and fine lines are even harder to diminish! Also make sure when the sun is shining that you have SPF in your moisturizer even though you might put foundation on top of it it is still better to have some protection than none or even better mix in a little bit of your SPF into your foundation which can also double up as coverage all over your face and from the sun...thats what I do and it works ;) Remember we arent trying to prevent getting dark from the sunlight which essentially even goes down a shade or two in their foundation during the summer this is protect us from wrinkles, sunburn, and damaging our skin!

Tip 2: Super Clean
Too much of everything is bad for our bodies and we all know that whether it be unhealthy foods, over exercising, or too much cleaning the face in this case.  How many of us have an endless supply of soaps, scurbs, face washes, and cleansers...I do! But thats okay as long as you dont over kill your face by constantly vigorously rubbing it and using really hot water. Remember not to use a tonne of cleaners and face wash and use only small amounts also make sure to wash your face gently with luke warm water and use a towel to pat it dry.

Tip 3: Slather Attack
It seems as if now a days there is a product for every single problem that we have whether it be fine lines,  un wanted pores, redness, acne and dark circles. Eye creams, serums, toners, night creams, oils and treatments....thats a lot of face products if you ask me! Make sure that you are not mixing products that have ingredients that will actually make your skin react or make your situation worse. This goes especially for people with sensitive and acne prone skin. I used to have an issue with acne but nothing serious just the occasional breakout here and there and all the products that were recommended to me had retinols and benzyl peroxide which are quite strong so just be careful because they are very strong and ask a pharmacist if your ever unsure.

So thats all for this post stay turned for more helpful tips and tricks and pictures will also be up soon <3

Friday, February 3, 2012


Welcome to my blog! Lets start off with a little introduction my name is Hira and I love everything to do with makeup. I went to school and studied business management and now after graduating I am persuing my ambition of being a freelance makeup artist. Ill be posting pictures of some of my work gradually and I am currently working on getting my first photoshoot together. Stay tuned for more posts and enjoy ;)